Why FileVault Disk Encryption is a Must-Have for Every Mac User
Why FileVault Disk Encryption is a Must-Have for Every Mac User
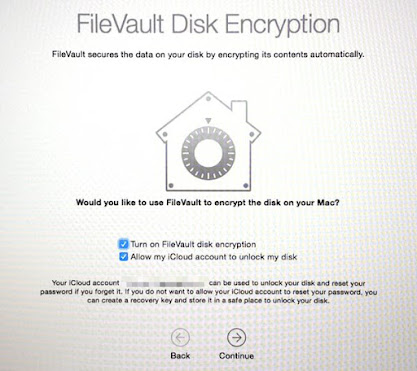
Data security is a must for Mac users. FileVault disk encryption is one way to protect your data.
FileVault, a macOS feature that offers strong security to your Mac's hard disk, makes it nearly impossible for anyone else to access your data without you permission.
This article will discuss FileVault disk encryption on Macs. It'll also explain how it works and how you can use it.
What is FileVault Disk Encryption?
Apple's FileVault disk encryption technology was developed for macOS. It encrypts data on your Mac's hard drives with XTS AES 128 encryption. This provides strong security. FileVault is an integrated feature of macOS. This means that you don't have to install or purchase any additional software.
FileVault Disk Encryption is a Great Option for Mac Users.
FileVault provides many benefits to Mac users including:
- Protection from unauthorized access: Without the encryption key, anyone who gains physical access or steals your Mac will not be able access your data.
- FileVault encryption ensures data privacy. This protects financial and personal information from prying eyes.
- Compliance with data privacy regulations: FileVault can help business owners and those who handle sensitive customer information comply with data protection regulations like HIPAA or GDPR.
How Does FileVault Disk Encryption Work?
FileVault encrypts your Mac's hard disk using XTS AES 128 encryption. XTS-AES encryption is a powerful encryption algorithm that protects your data from unauthorised access.
Enabling FileVault immediately starts the encryption process, meaning that all data on your Mac's hard drives is encrypted. Access to the data can only be made possible by the right encryption key that is linked to your user account.
Install FileVault Disk Encryption On Your Mac
Before you enable FileVault, make sure that your Mac meets all system requirements. FileVault needs:
- A Mac equipped with an Intel processor, or Apple Silicon
- OS X Lion and later
After you have verified that your Mac meets these system requirements, FileVault can be enabled. Here's how:
- Click on the Apple logo at the top left corner of the screen to open System Preferences. Select "System Preferences" from the menu.
- Click on "Security & Privacy".
- Click on the tab "FileVault".
- Click the lock icon at the bottom left corner to enter your administrator username.
- Click on "Turn on FileVault."
Allow FileVault Disk Encryption On Your Mac
It is easy to enable FileVault for your Mac. FileVault will automatically encrypt your data in the background once you have it set up. How to enable it?
- Click on the Apple logo at the top left corner of the screen to open System Preferences. Select "System Preferences" from the menu.
- Click on "Security & Privacy."
- Click on "FileVault"
FileVault Decrypt Your Mac's Hard Drive
There are several steps to follow if you want to decrypt your Mac's drive using FileVault. You should know that all data on your Mac's hard drive will be available without an encryption key once you have decrypted it.
How to decrypt your Mac's hard disk with FileVault
- Click on the Apple logo at the top left corner of the screen to open System Preferences. Select "System Preferences" from the menu.
- Click on "Security & Privacy."
- Click on the tab "FileVault".
- Click the lock icon at the bottom left corner to enter your administrator username.
- Click on "Turn off FileVault."
- Wait for the encryption process to finish. This process can take a while depending on the amount of data on your Mac's hard disk.
- After the encryption process is completed, restart your Mac.
Once your Mac has restarted you will be able access all data on your hard disk without needing an encryption key. This also means anyone with access to your Mac will be able to access your data. You will need to repeat the setup process if you wish to re-enable FileVault.
How to Manage FileVault Disk Encryption for Your Mac
FileVault disk encryption, a Mac-built feature that encrypts your data, is an added layer of security. It's important that you understand how FileVault is managed if FileVault has been enabled on your Mac. This will ensure that your data remains secure.
These are some tips to help you manage FileVault disk encryption for your Mac.
- FileVault can be enabled by going to System Preferences > Security and Privacy > FileVault. Click on "Turn on FileVault". Follow the prompts for a recovery key to be created and which users can unlock the disk.
- Backup your recovery key: Make sure you keep your recovery key safe. Although you can store it with Apple, it is recommended that it be written down and kept in a safe place. You won't have access to your data if you lose your recovery keys.
- Check your encryption status: Go to System Preferences > Security and Privacy > FileVault to check the encryption status. You'll see the message "FileVault turned on for this disk [name]" if your disk is encrypted.
- You can manage users: To add or remove users that have the ability to unlock the disk, visit System Preferences > Security and Privacy > FileVault. Click on "Enable users." You can then add or remove users with permission to unlock the disk.
- Disable FileVault: To disable FileVault, visit System Preferences > Security and Privacy > FileVault. Click on "Turn off FileVault." This will decrypt your hard drive and any person who has access to your Mac can access your data.
These tips will help you ensure your data is secure using FileVault disk encryption for your Mac.
Time Machine Backups and FileVault Disk Encryption
Two important features of Mac computers are FileVault disk encryption, and Time Machine backups. They provide different levels of data security. There are some things you should keep in mind when using them together.
Here are the facts about FileVault disk encryption, Time Machine backups and FileVault file vault encryption:
- Encrypted Backups: This means that anyone who gains access to your backup drive will not be able access your data without your encryption key.
- FileVault enabled may cause backups to take longer.
- Backup Key Recovery: FileVault will ask you to create a Recovery Key in case you forget your password. This key is important as it will allow you to access your backups in case you forget your password.
- Accessing backups from other Macs: To access encrypted Time Machine backups on another Mac you will need to enter the recovery key or password. You won't be allowed to access backups if FileVault is disabled on the other Mac.
- Migration to a new Mac: To access backup data on your new Mac, you will also need to enter the recovery key or password.


Comments
Post a Comment